Big O and time complexity

The time it takes to run the function as the size of the input (to the function grows)

Big O notation used to express time complexity

time complexity: linear time complexity – as size increases the time increases linearly
linear time – O(n)
constant time complexity – as size increases time stays constant O(1)
quadratic time complexity – time increases like quadratic function O(n2)

Java Memory Management

The major concepts in Java Memory Management :

  • JVM Memory Structure
  • Working of Garbage Collector

JVM defines various run time data area which are used during execution of a program. Some of the areas are created by the JVM whereas some are created by the threads that are used in a program. However, the memory area created by JVM is destroyed only when the JVM exits. The data areas of thread are created during instantiation and destroyed when the thread exits.

JVM Memory area parts

JVM Memory area parts

These parts of the memory area in detail:

Heap :

  • It is a shared runtime data area and stores the actual object in a memory. It is instantiated during the virtual machine startup.
  • This memory is allocated for all class instances and array. Heap can be of fixed or dynamic size depending upon the system’s configuration.
  • JVM provides the user control to initialize or vary the size of heap as per the requirement. When a new keyword is used, object is assigned a space in heap, but the reference of the same exists onto the stack.
  • There exists one and only one heap for a running JVM process.

Scanner sc = new Scanner(System.in);

The above statement creates the object of Scanner class which gets allocated to heap whereas the reference ‘sc’ gets pushed to the stack.

Note: Garbage collection in heap area is mandatory.

Method Area:

  • It is a logical part of the heap area and is created on virtual machine startup.
  • This memory is allocated for class structures, method data and constructor field data, and also for interfaces or special method used in class. Heap can be of fixed or dynamic size depending upon the system’s configuration.
  • Can be of a fixed size or expanded as required by the computation. Needs not to be contiguous.

Note: Though method area is logically a part of heap, it may or may not be garbage collected even if garbage collection is compulsory in heap area.

JVM Stacks:

  • A stack is created at the same time when a thread is created and is used to store data and partial results which will be needed while returning value for method and performing dynamic linking.
  • Stacks can either be of fixed or dynamic size. The size of a stack can be chosen independently when it is created.
  • The memory for stack needs not to be contiguous.

PermGen vs MetaSpace

PermGen (Permanent Generation) is a special heap space separated from the main memory heap.

The JVM keeps track of loaded class metadata in the PermGen. Additionally, the JVM stores all the static content in this memory section. This includes all the static methods, primitive variables, and references to the static objects.

Furthermore, it contains data about bytecode, names and JIT information. Before Java 7, the String Pool was also part of this memory. The disadvantages of the fixed pool size are listed in our write-up.

The default maximum memory size for 32-bit JVM is 64 MB and 82 MB for the 64-bit version.

However, we can change the default size with the JVM options:

  • -XX:PermSize=[size] is the initial or minimum size of the PermGen space
  • -XX:MaxPermSize=[size] is the maximum size

Most importantly, Oracle completely removed this memory space in JDK 8 release.

With its limited memory size, PermGen is involved in generating the famous OutOfMemoryError. Simply put, the class loaders aren’t garbage collected properly and, as a result, generated a memory leak.

Therefore, we receive a memory space error; this happens mostly on development environment while creating new class loaders.

Metaspace

Simply put, Metaspace is a new memory space – starting from the Java 8 version; it has replaced the older PermGen memory space. The most significant difference is how it handles the memory allocation.

As a result, this native memory region grows automatically by default. Here we also have new flags to tune-up the memory:

  • MetaspaceSize and MaxMetaspaceSize – we can set the Metaspace upper bounds.
  • MinMetaspaceFreeRatio – is the minimum percentage of class metadata capacity free after garbage collection
  • MaxMetaspaceFreeRatio – is the maximum percentage of class metadata capacity free after a garbage collection to avoid a reduction in the amount of space

Additionally, the garbage collection process also gains some benefits from this change. The garbage collector now automatically triggers cleaning of the dead classes once the class metadata usage reaches its maximum metaspace size.

Therefore, with this improvement, JVM reduces the chance to get the OutOfMemory error.

Despite all of this improvements, we still need to monitor and tune up the metaspace to avoid memory leaks.

Continuous Integration (CI) vs. Delivery (CDeli) vs Deployment (CDeploy)

CI and CD are two acronyms that are often mentioned when people talk about modern development practices. CI is straightforward and stands for continuous integration, a practice that focuses on making preparing a release easier. But CD can either mean continuous delivery or continuous deployment, and while those two practices have a lot in common, they also have a significant difference that can have critical consequences for a business.

We will see in this article what these three practices mean and what’s required to use them.

What are the differences between continuous integration, continuous delivery, and continuous deployment?

Continuous integration

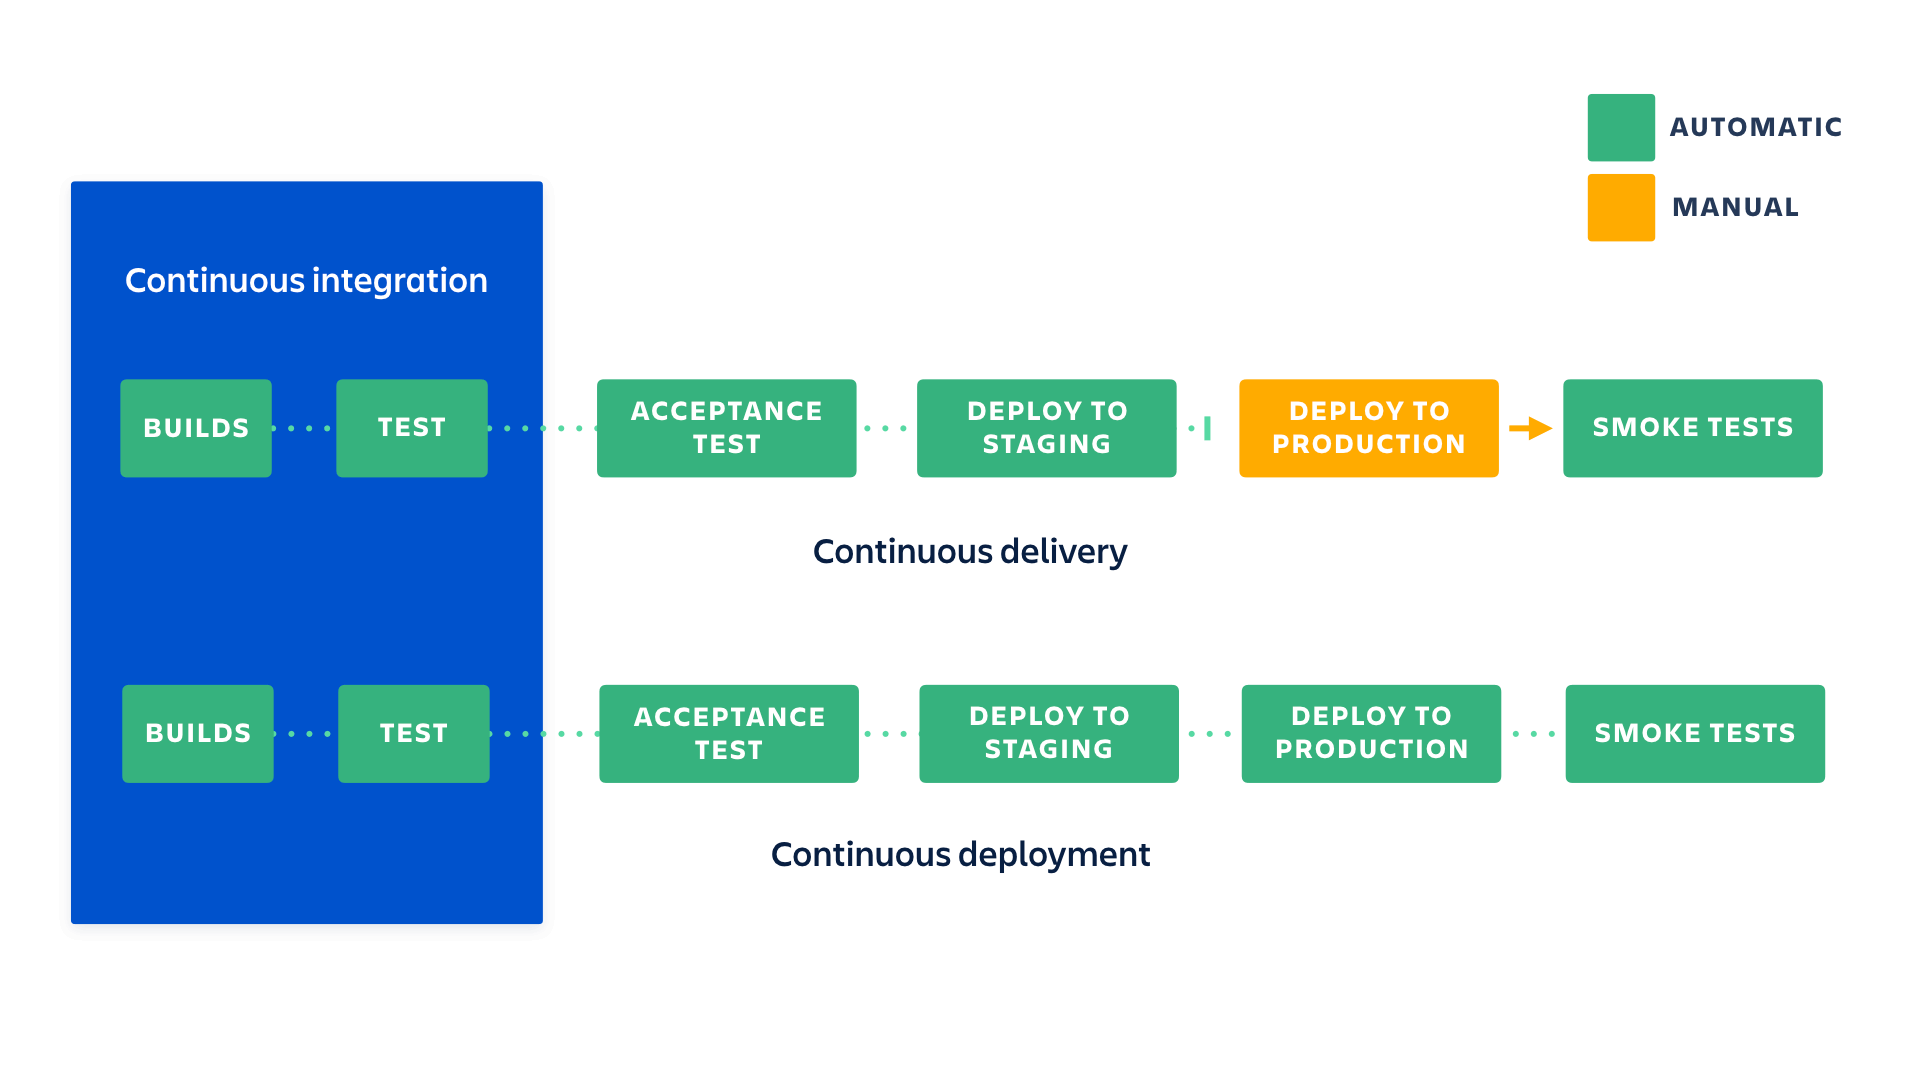
Developers practicing continuous integration merge their changes back to the main branch as often as possible. The developer’s changes are validated by creating a build and running automated tests against the build. By doing so, you avoid the integration hell that usually happens when people wait for release day to merge their changes into the release branch.

Continuous integration puts a great emphasis on testing automation to check that the application is not broken whenever new commits are integrated into the main branch.

Continuous delivery

Continuous delivery is an extension of continuous integration to make sure that you can release new changes to your customers quickly in a sustainable way. This means that on top of having automated your testing, you also have automated your release process and you can deploy your application at any point of time by clicking on a button.

In theory, with continuous delivery, you can decide to release daily, weekly, fortnightly, or whatever suits your business requirements. However, if you truly want to get the benefits of continuous delivery, you should deploy to production as early as possible to make sure that you release small batches that are easy to troubleshoot in case of a problem.

Continuous deployment

Continuous deployment goes one step further than continuous delivery. With this practice, every change that passes all stages of your production pipeline is released to your customers. There’s no human intervention, and only a failed test will prevent a new change to be deployed to production.

Continuous deployment is an excellent way to accelerate the feedback loop with your customers and take pressure off the team as there isn’t a Release Day anymore. Developers can focus on building software, and they see their work go live minutes after they’ve finished working on it.

How the practices relate to each other

To put it simply continuous integration is part of both continuous delivery and continuous deployment. And continuous deployment is like continuous delivery, except that releases happen automatically.

What are the differences between continuous integration, continuous delivery, and continuous deployment? | Atlassian CI/CD

What are the benefits of each practice?

We’ve explained the difference between continuous integration, continuous delivery, and continuous deployments but we haven’t yet looked into the reasons why you would adopt them. There’s an obvious cost to implementing each practice, but it’s largely outweighed by their benefits.

Continuous integration

What you need (cost)

  • Your team will need to write automated tests for each new feature, improvement or bug fix.
  • You need a continuous integration server that can monitor the main repository and run the tests automatically for every new commits pushed.
  • Developers need to merge their changes as often as possible, at least once a day.

What you gain

  • Less bugs get shipped to production as regressions are captured early by the automated tests.
  • Building the release is easy as all integration issues have been solved early.
  • Less context switching as developers are alerted as soon as they break the build and can work on fixing it before they move to another task.
  • Testing costs are reduced drastically – your CI server can run hundreds of tests in the matter of seconds.
  • Your QA team spend less time testing and can focus on significant improvements to the quality culture.

Continuous delivery

What you need (cost)

  • You need a strong foundation in continuous integration and your test suite needs to cover enough of your codebase.
  • Deployments need to be automated. The trigger is still manual but once a deployment is started there shouldn’t be a need for human intervention.
  • Your team will most likely need to embrace feature flags so that incomplete features do not affect customers in production.

What you gain

  • The complexity of deploying software has been taken away. Your team doesn’t have to spend days preparing for a release anymore.
  • You can release more often, thus accelerating the feedback loop with your customers.
  • There is much less pressure on decisions for small changes, hence encouraging iterating faster.

Continuous deployment

What you need (cost)

  • Your testing culture needs to be at its best. The quality of your test suite will determine the quality of your releases.
  • Your documentation process will need to keep up with the pace of deployments.
  • Feature flags become an inherent part of the process of releasing significant changes to make sure you can coordinate with other departments (Support, Marketing, PR…).

What you gain

  • You can develop faster as there’s no need to pause development for releases. Deployments pipelines are triggered automatically for every change.
  • Releases are less risky and easier to fix in case of problem as you deploy small batches of changes.
  • Customers see a continuous stream of improvements, and quality increases every day, instead of every month, quarter or year.

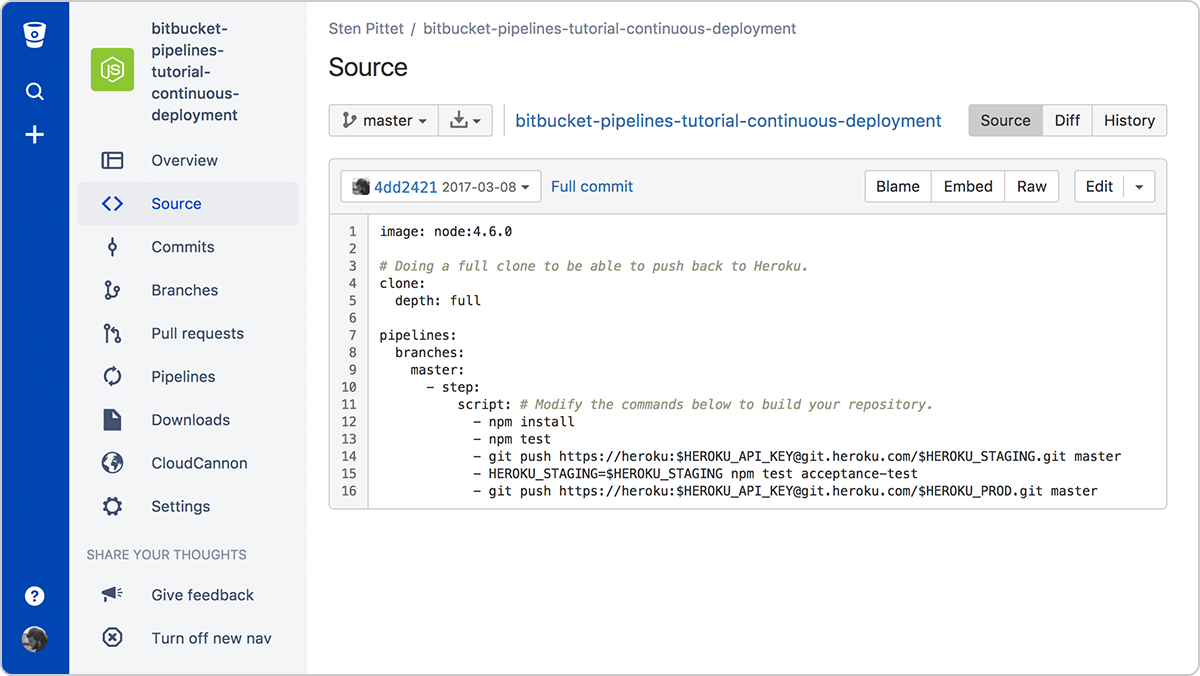
One of the traditional cost associated with continuous integration is the installation and maintenance of a CI server. But you can reduce significantly the cost of adopting these practices by using a cloud service like Bitbucket Pipelines which adds automation to every Bitbucket repository. By simply adding a configuration file at the root of your repository you will be able to create a continuous deployment pipeline that gets executed for every new change pushed to the main branch.

A continuous deployment pipeline with Bitbucket | Atlassian CI/CD

Going from continuous integration to continuous deployment

If you’re just getting started on a new project with no users yet, it might be easy for you to deploy every commit to production. You could even start by automating your deployments and release your alpha version to a production with no customers. Then you would ramp up your testing culture and make sure that you increase code coverage as you build your application. By the time you’re ready to onboard users, you will have a great continuous deployment process where all new changes are tested before being automatically released to production.

But if you already have an existing application with customers you should slow things down and start with continuous integration and continuous delivery. Start by implementing basic unit tests that get executed automatically, no need to focus yet on having complex end-to-end tests running. Instead, you should try automating your deployments as soon as possible and get a to a stage where deployments to your staging environments are done automatically. The reason is that by having automatic deployments, you will be able to focus your energy on improving your tests rather than having periodically to stop things to coordinate a release.

Once you can start releasing software on a daily basis, you can look into continuous deployment, but make sure that the rest of your organization is ready as well. Documentation, support, marketing. These functions will need to adapt to the new cadence of releases, and it is important that they do not miss on significant changes that can impact customers.

Copied from: https://www.atlassian.com/continuous-delivery/principles/continuous-integration-vs-delivery-vs-deployment

Database Migration

Data Migration goal is to enhance performance and competitiveness

Inexperienced execution causes more problems than solving it and also includes missing deadlines and exceeding budgets, incomplete plans this should be treated as a high priority

A strategic data migration plan should include consideration of these critical factors:

Knowing the data — Before migration, source data needs to undergo a complete audit. Unexpected issues can surface if this step is ignored.

Cleanup — Once you identify any issues with your source data, they must be resolved. This may require additional software tools and third-party resources because of the scale of the work.

Maintenance and protection — Data undergoes degradation after a period of time, making it unreliable. This means there must be controls in place to maintain data quality.

Governance — Tracking and reporting on data quality is important because it enables a better understanding of data integrity. The processes and tools used to produce this information should be highly usable and automate functions where possible.

In addition to a structured, step-by-step procedure, a data migration plan should include a process for bringing on the right software and tools for the project.

Data Migration Strategies
There is more than one way to build a data migration strategy. An organization’s specific business needs and requirements will help establish what’s most appropriate. However, most strategies fall into one of two categories: “big bang” or “trickle.”

“Big Bang” Migration
In a big bang data migration, the full transfer is completed within a limited window of time.
Live systems experience downtime while data goes through ETL processing and transitions to the new database.

The drawback of this method is, of course, that it all happens in one time-boxed event, requiring relatively little time to complete. The pressure, though, can be intense, as the business operates with one of its resources offline. This risks compromised implementation.

If the big bang approach makes the most sense for your business, consider running through the migration process before the actual event.

“Trickle” Migration
Trickle migrations, in contrast, complete the migration process in phases. During implementation, the old system and the new are run in parallel, which eliminates downtime or operational interruptions. Processes running in real-time can keep data continuously migrating.

Compared to the big bang approach, these implementations can be fairly complex in design. However, the added complexity — if done right — usually reduces risks, rather than adding them.

Best Practices for Data Migration
Regardless of which implementation method you follow, there are some best practices to keep in mind:

Back up the data before executing.
In case something goes wrong during the implementation, you can’t afford to lose data. Make sure there are backup resources and that they’ve been tested before you proceed.

Stick to the strategy.
Too many data managers make a plan and then abandon it when the process goes “too” smoothly or when things get out of hand. The migration process can be complicated and even frustrating at times, so prepare for that reality and then stick to the plan.

Test, test, test.
During the planning and design phases, and throughout implementation and maintenance, test the data migration to make sure you will eventually achieve the desired outcome.

6 Key Steps in a Data Migration Strategy
Each strategy will vary in the specifics, based on the organization’s needs and goals, but generally, a data migration plan should follow a common, recognizable pattern.

1. Explore and Assess the Source
Before migrating data, you must know (and understand) what you’re migrating, as well as how it fits within the target system. Understand how much data is pulling over and what that data looks like.

There may be data with lots of fields, some of which won’t need to be mapped to the target system.
There may also be missing data fields within a source that will need to pull from another location to fill a gap. Ask yourself what needs to migrate over, what can be left behind, and what might be missing.

Beyond meeting the requirements for data fields to be transferred, run an audit on the actual data contained within. If there are poorly populated fields, a lot of incomplete data pieces, inaccuracies, or other problems, you may reconsider whether you really need to go through the process of migrating that data in the first place.

If an organization skips this source review step, and assumes an understanding of the data, the result could be wasted time and money on migration. Worse, the organization could run into a critical flaw in the data mapping that halts any progress in its tracks.

2. Define and Design the Migration
The design phase is where organizations define the type of migration to take on — big bang or trickle. This also involves drawing out the technical architecture of the solution and detailing the migration processes.

Considering the design, the data to be pulled over, and the target system, you can begin to define timelines and any project concerns. By the end of this step, the whole project should be documented.

During planning, it’s important to consider security plans for the data. Any data that needs to be protected should have protection threaded throughout the plan.

3. Build the Migration Solution
It can be tempting to approach migration with a “just enough” development approach. However, since you will only undergo the implementation one time, it’s crucial to get it right. A common tactic is to break the data into subsets and build out one category at a time, followed by a test. If an organization is working on a particularly large migration, it might make sense to build and test in parallel.

4. Conduct a Live Test
The testing process isn’t over after testing the code during the build phase. It’s important to test the data migration design with real data to ensure the accuracy of the implementation and completeness of the application.

5. Flipping the Switch
After final testing, implementation can proceed, using the style defined in the plan.

6. Audit
Once the implementation has gone live, set up a system to audit the data in order to ensure the accuracy of the migration.

7. Data Migration Software
Building out data migration tools from scratch, and coding them by hand, is challenging and incredibly time-consuming. Data tools that simplify migration are more efficient and cost-effective.

When you start your search for a software solution, look for these factors in a vendor:

Connectivity — Does the solution support the systems and software you currently use?
Scalability — What are the data limits for the software, and will data needs to exceed them in the foreseeable future?
Security — Take time investigating a software platform’s security measures. You’re data is one of your most valuable resources, and it must remain protected.
Speed — How quickly can processing occur on the platform?

Transaction Isolation Levels

As we know that, in order to maintain consistency in a database, it follows ACID properties. Among these four properties (Atomicity, Consistency, Isolation and Durability) Isolation determines how transaction integrity is visible to other users and systems. It means that a transaction should take place in a system in such a way that it is the only transaction that is accessing the resources in a database system.
Isolation levels define the degree to which a transaction must be isolated from the data modifications made by any other transaction in the database system.

A transaction isolation level is defined by the following phenomena:

  • Dirty Read – A Dirty read is the situation when a transaction reads a data that has not yet been committed. For example, Let’s say transaction 1 updates a row and leaves it uncommitted, meanwhile, Transaction 2 reads the updated row. If transaction 1 rolls back the change, transaction 2 will have read data that is considered never to have existed.
  • Non Repeatable read – Non Repeatable read occurs when a transaction reads same row twice, and get a different value each time. For example, suppose transaction T1 reads data. Due to concurrency, another transaction T2 updates the same data and commit, Now if transaction T1 rereads the same data, it will retrieve a different value.
  • Phantom Read – Phantom Read occurs when two same queries are executed, but the rows retrieved by the two, are different. For example, suppose transaction T1 retrieves a set of rows that satisfy some search criteria. Now, Transaction T2 generates some new rows that match the search criteria for transaction T1. If transaction T1 re-executes the statement that reads the rows, it gets a different set of rows this time.

Based on these phenomena, The SQL standard defines four isolation levels :

  1. Read Uncommitted – Read Uncommitted is the lowest isolation level. In this level, one transaction may read not yet committed changes made by other transaction, thereby allowing dirty reads. In this level, transactions are not isolated from each other.
  2. Read Committed – This isolation level guarantees that any data read is committed at the moment it is read. Thus it does not allows dirty read. The transaction holds a read or write lock on the current row, and thus prevent other transactions from reading, updating or deleting it.
  3. Repeatable Read – This is the most restrictive isolation level. The transaction holds read locks on all rows it references and writes locks on all rows it inserts, updates, or deletes. Since other transaction cannot read, update or delete these rows, consequently it avoids non-repeatable read.
  4. Serializable – This is the Highest isolation level. A serializable execution is guaranteed to be serializable. Serializable execution is defined to be an execution of operations in which concurrently executing transactions appears to be serially executing.

The Table is given below clearly depicts the relationship between isolation levels, read phenomena and locks :

Microservice Advantages and design considerations

In technical terms, a microservice system allows development of single function modules. This trend of developing single function modules has increased agility, performance and cost efficiency for organizations both large and small while enabling continuous testing and early delivery. But, before we delve deeper into the fundamentals of microservice design let us have a look at its advantages.

Advantages Of Microservice Architecture
Technological Flexibility
While monolithic architecture always left the developers looking for the “right tool for the job,” a microservice architecture offers coexistence of multiple technologies under one cover.
Different decoupled services can be written in multiple programming languages. Not only does this enable developers to experiment but also scale their product by adding additional features and functionalities.

Increased EfficiencyMicroservice architecture speeds up the entire process of creation. Unlike a single unit, teams can work simultaneously on multiple components of a software system. This, in addition to increasing productivity, makes it easier to locate specific components and focus on them.
Malfunctioning of a single component will not affect the entire system. Instead, this also eases error location and maintenance.

Products Not Projects
According to Martin Fowler, microservice architecture helps businesses create “products instead of projects.” In simpler terms, the use of microservice architecture allows teams to come together and create functionality for business rather than simple code. The entire team comes together to contribute to different functionalities. These can further be used for different lines of business if applicable. In addition, it also creates an autonomous, cross-functional team.

Fundamentals to A Successful Microservice Design

1. The Scope Of Functionality
guidelines or steps to define the scope of microservice are:
a) identify the code or peice of coe replicated under various modules
b) identify module is loosely coupled with rest of services
c) check if the features would be used with heavy load, allows the microservice that would have to be scaled up in the near future.

2. High Cohesion Combined With Loose Coupling
When breaking down a monolithic architecture into smaller services or components, it is important to combine similar functionalities. This combination of related logic into a single unit is known as cohesion. The higher the cohesion, the better is the microservice architecture. A low cohesion would indicate too much communication between different services leading to poor system performance.

3. Unique Source Of Identification important for any service to be the unique source of identification for the rest of the system. e.g. for order mgmt service order id is of the source of truth for other services (rather than other attributes of order record)

4. API Integration
The fundamental of microservice design is using the correct API. This is crucial to maintaining communication between the service and the client calls. Easy transition and execution are important for proper functioning.

Another important thing to note while creating an API is the domain of the business.
This definition of the domain will ease out the process of differentiating the functionality.
There are several clients which are external to the system. These clients could be other applications or users. Whenever a business logic is called, it is handled by an adapter (a message gateway or web controller) which returns the request and makes changes to the database

5. Data Storage Segregation
Any data stored for a specific service should be made private to that specific service.
This means any access to the data should be owned by the service. This data can be shared with any other service only through an API. This is very important to maintain limited access to data and avoid “service coupling.” Classification of data based on the users is important and can be achieved through the Command and Query Responsibility Segregation (CQRS).

Command and Query Responsibility Segregation (CQRS): Every CQRS object is divided in two objects: one for the query and one for the command.
A command is defined as a method that changes state.
On the contrary, a query only returns a value two data stores 1 for read and another for writes
queries are read from the read store
commands updates messages to write store and also updates events to read store (which serve queries).

6. Traffic Management
Once the APIs have been set and the system is up and running, traffic to different services will vary. The traffic is the calls sent to specific services by the client. In the real world scenario, a service may run slowly, thus, causing calls to take more time. Or a service may be flooded with calls. In both the cases, the performance will be affected even causing a software or hardware crash.

This high traffic demand needs management. A specific way of calling and being called is the answer to a smooth flow of traffic. The services should be able to terminate any such instances which cause delay and affect the performance.

This can also be achieved using a process known as ‘auto-scaling’ which includes constant tracking of services with prompt action whenever required. In some cases, a ‘circuit breaker pattern‘ is important to supply whatever incomplete information is available in case of a broken call or an unresponsive service.

Circuit Breaker Pattern (CB): circuit breaker pattern protect against cascading failures and to provide fallback behavior for potentially failing calls.

7. Automating The Process
CI & CD of microservice

8. Minimal Database Tables (Preferably Isolated Tables)
Accessing database tables to fetch data can be a lengthy process. It can take up time and energy. While designing a microservice, the main motive should revolve around the business function rather than the database and its working. To ensure this, even with data entries running into millions, a microservice design should have only a couple of tables. In addition to minimum numbers, focus around the business is key.

9. Constant Monitoring
prometheus, caching etc.,

Core Java Questions

to make variable Thread Safe
volatile – the changes made in the variable are immediately reflected in case of volatile
static – Note that volatile should not be confused with the static modifier. static variables are class members that are shared among all objects. There is only one copy of them in the main memory.

volatile vs synchronized

Before we move on let’s take a look at two important features of locks and synchronization.

Mutual Exclusion It means that only one thread or process can execute a block of code (critical section) at a time.
Visibility It means that changes made by one thread to shared data are visible to other threads.

Java’s synchronized keyword guarantees both mutual exclusion and visibility. If we make the blocks of threads that modifies the value of shared variable synchronized only one thread can enter the block and changes made by it will be reflected in the main memory. All other thread trying to
enter the block at the same time will be blocked and put to sleep.

In some cases, we may only desire visibility and not atomicity. The use of synchronized in such a situation is overkill and may cause scalability problems. Here volatile comes to the rescue.
Volatile variables have the visibility features of synchronized but not the atomicity features

Class level locking vs Object level locking

Synchronization : Is a modifier which is used for method and block only. With the help of synchronized modifier we can restrict a shared resource to be accessed only by one thread. When two or more threads need access to shared resources, there is some loss of data i.e. data inconsistency. The process by which we can achieve data consistency between multiple threads it is called Synchronization.

Why do you need Synchronization?
Let us assume if you have two threads that are reading and writing to the same ‘resource’. Suppose there is a variable named as geek, and you want that at one time only one thread should access the variable(atomic way). But Without the synchronized keyword, your thread 1 may not see the changes thread 2 made to geek, or worse, it may only be half changed that cause the data inconsistency problem. This would not be what you logically expect. The tool needed to prevent these errors is synchronization.

In synchronization, there are two types of locks on threads:

  1. Object level lock : Every object in java has a unique lock. Whenever we are using synchronized keyword, then only lock concept will come in the picture. If a thread wants to execute synchronized method on the given object. First, it has to get lock of that object. Once thread got the lock then it is allowed to execute any synchronized method on that object. Once method execution completes automatically thread releases the lock. Acquiring and release lock internally is taken care by JVM and programmer is not responsible for these activities. Lets have a look on the below program to understand the object level lock:

Object level lock is mechanism when we want to synchronize a non-static method or non-static code block such that only one thread will be able to execute the code block on given instance of the class. This should always be done to make instance level data thread safe.

Object level locking can be done as below :

Various ways for object level locking
public class DemoClass
{
public synchronized void demoMethod(){}
}

or

public class DemoClass
{
public void demoMethod(){
synchronized (this)
{
//other thread safe code
}
}
}

or

public class DemoClass
{
private final Object lock = new Object();
public void demoMethod(){
synchronized (lock)
{
//other thread safe code
}
}
}

2. Class level lock : Every class in java has a unique lock which is nothing but class level lock. If a thread wants to execute a static synchronized method, then thread requires class level lock. Once a thread got the class level lock, then it is allowed to execute any static synchronized method of that class. Once method execution completes automatically thread releases the lock. Lets look on the below program for better understanding:

Class level locking should always be done to make static data thread safe. As we know that static keyword associate data of methods to class level, so use locking at static fields or methods to make it on class level.

Various ways for class level locking
public class DemoClass
{
//Method is static
public synchronized static void demoMethod(){

}

}

or

public class DemoClass
{
public void demoMethod()
{
//Acquire lock on .class reference
synchronized (DemoClass.class)
{
//other thread safe code
}
}
}

or

public class DemoClass
{
private final static Object lock = new Object();

public void demoMethod()
{
    //Lock object is static
    synchronized (lock)
    {
        //other thread safe code
    }
}

}

Java ClassLoaders

  • Load Classes in JVM Memory
  • Three builtin classloaders: 1. 1. bootstrap 2. extensions 3. system
  • can create custom classloaders

What is Deadlock? How to analyze and avoid deadlock situation?

Deadlock is a programming situation where two or more threads are blocked forever, this situation arises with at least two threads and two or more resources.

To analyze a deadlock, we need to look at the java thread dump of the application, we need to look out for the threads with state as BLOCKED and then the resources it’s waiting to lock, every resource has a unique ID using which we can find which thread is already holding the lock on the object.

Avoid Nested Locks, Lock Only What is Required and Avoid waiting indefinitely are common ways to avoid deadlock situation, read this post to learn how to analyze deadlock in java with a sample program.

Microservice 12 Factor App

Microservices Architecture – The 12 Factors applied to microservices are

1 – Codebase
One codebase per service, tracked in revision control; many deploys
The Twelve‑Factor App recommends one codebase per app. In a microservices architecture, the correct approach is actually one codebase per service. Additionally, we strongly recommend the use of Git as a repository, because of its rich feature set and enormous ecosystem. e.g. Github has become the default Git hosting platform in the opensource community, but there are many other excellent Git hosting options, depending on the needs of your organization.

2 – Dependencies
Explicitly declare and isolate dependencies
As suggested in The Twelve‑Factor App, regardless of what platform your application is running on, use the dependency manager included with your language or framework. How you install the operating system or platform
dependencies depend on the platform:

In noncontainerized environments, use a configuration management tool (Chef, Puppet, Ansible) to install system dependencies.
In a containerized environment, do this in Dockerfile.

Note: We recommend that you choose a dependency management mechanism in the context of your comprehensive Infrastructure‑as‑Code strategy, not as an isolated decision. See Martin Fowler’s writings on Infrastructure‑as‑Code and download the O’Reilly report Infrastructure as Code by Kief Morris.

3 – Config
Store configuration in the environment
Anything that varies between deployments can be considered configuration. The Twelve‑Factor App guidelines recommend storing all configuration in the environment, rather than committing it to the repository. We recommend the following specific practices:

  • Use non‑version controlled .env files for local development. Docker supports the loading of these files at runtime.
  • Keep all .env files in a secure storage system, such as Vault, to keep the files available to the development teams, but not commited to Git.
  • Use an environment variable for anything that can change at runtime, and for any secrets that should not be committed to the shared repository.
  • Once you have deployed your application to a delivery platform, use the delivery platform’s mechanism for managing environment variables.

4 – Backing Services
Treat backing services as attached resources
The Twelve‑Factor App guidelines define a backing service as “any service the app consumes over the network as part of its normal operation.” The implication for microservices is that anything external to a service is treated as an attached resource, including other services. This ensures that every service is completely portable and loosely coupled to the other resources in the system. Additionally, the strict separation increases flexibility during development – developers only need to run the service(s) they are modifying, not others.

5 – Build, Release, Run
Strictly separate build and run stages
To support strict separation of build, release, and run stages, as recommended by The Twelve‑Factor App, we recommend the use of a continuous integration/continuous delivery (CI/CD) tool to automate builds. Docker images make it easy to separate the build and run stages. Ideally, images are created from every commit and treated as deployment artifacts.

6 – Processes
Execute the app in one or more stateless processes
For microservices, the important point in the Processes factor is that your application needs to be stateless.
This makes it easy to scale a service horizontally by simply adding more instances of that service. Store any stateful data, or data that needs to be shared between instances, in a backing service.

7 – Data Isolation
Each service manages its own data
As a modification to make the Port binding factor more useful for microservices, we recommend that you allow access to the persistent data owned by a service only via the service’s API. This prevents implicit service
contracts between microservices and ensures that microservices can’t become tightly coupled. Data isolation also allows the developer to choose, for each service, the type of data store that best suits its needs.

8 – Concurrency
Scale out via the process model
The Unix process model is largely a predecessor to a true microservices architecture, insofar as it allows specialization and resource sharing for different tasks within a monolithic application. In a microservices architecture, you can horizontally scale each service independently, to the extent supported by the underlying infrastructure. With containerized services, you further get the concurrency recommended in the Twelve‑Factor App, for free.

9 – Disposability
Maximize robustness with fast startup and graceful shutdown
Instances of a service need to be disposable so they can be started, stopped, and redeployed quickly, and with no loss of data. Services deployed in Docker containers satisfy this requirement automatically, as it’s an inherent feature of containers that they can be stopped and started instantly. Storing state or session data in queues or other backing services ensures that a request is handled seamlessly in the event of a container crash. We are also proponents of using a backing store to support crash‑only design.

10 – Dev/Prod Parity
Keep development, staging, and production as similar as possible
Keep all of your environments – development, staging, production, and so on – as identical as possible, to reduce the risk that bugs show up only in some environments. To support this principle, we recommend, again, the use of containers – a very powerful tool here, as they enable you to run exactly the same execution environment all the way from local development through production. Keep in mind, however, that differences in the underlying data can still cause differences at runtime.

11 – Logs
Treat logs as event streams
Instead of including code in a microservice for routing or storing logs, use one of the many good log‑management solutions on the market, several of which are listed in the Twelve‑Factor App. Further, deciding how you work with logs needs to be part of a larger APM and/or PaaS strategy.

12 – Admin Processes
Run admin and management tasks as one‑off processes
In a production environment, run administrative and maintenance tasks separately from the app. Containers make this very easy, as you can spin up a container just to run a task and then shut it down.